Emblem fitting/compatibility
This web app is intended for designing OE-style replacement emblems, primarily for model year 2020 and newer Mazda MX-5s (ND2 and ND3; “SKYACTIV G”; OE part number NF6W-51-771). However, emblems designed with this app may also fit other vehicles and model years, especially when pins are not required.
WARNING: Use this app at your own risk!
During development, I aimed to achieve an accuracy of 0.1 millimetre.
However, the app is still in beta. The measurements provided are theoretical, and no emblem has yet been selected for mass production (as of version the current beta version).
Dimensions
The OE SKYACTIV G emblem on model year 2020 and newer MX-5s measures approximately 105.2 × 15.2 mm.
Within these dimensions, the app uses a horizontally and vertically centred working area of 96 × 11 mm.
This leaves total clearances of 9.2 mm horizontally and 4.2 mm vertically: 4.6 mm on each side and 2.1 mm at the top and bottom.
OE fitting with pins
The OE emblem has pins on the back. Activating With pins in the 3D Preview adds these pins to the 3D model.
This version SHOULD be suitable as a replacement for the OE badge when manufactured to high automotive quality standards.
To secure the emblem to the car, use two speed nuts, part no. 995783000, for the left and right pins, fitted from inside the rear bumper.
I recommend having this done by a professional workshop, as removing and reinstalling the rear bumper and securing the emblem properly with adhesive and pins may require advanced skills.
Compatibility without pins on other models and vehicles
Theoretically, without pins, you can position the emblem wherever you like.
Removing your OE emblem may leave holes in the bodywork, depending on your vehicle.
To determine whether you can use an emblem created with this app, check that it fully covers the holes, with a safety margin of approximately 2 mm around each hole.
Use the template!
- Download OEM_Badge_Rear_View_1_to_1_Pin_Check.pdf.
- Print at 100% / Actual Size. Disable Fit, Shrink, Scale-to-Fit and borderless enlargement to ensure a 1:1 print at actual size.
- Measure the printed calibration line to confirm that it is exactly 10 cm (100 mm) long. If it is not, adjust your print settings and print again to obtain a true 1:1 result.
- Carefully cut out the emblem rectangle.
- Check on your vehicle that the template fully covers the holes, including a 2 mm safety margin around each hole. For this check, you can ignore the pin-position markings.
Compatibility list
Sizing considerations
Theoretically, the emblem for ND2/ND3 MX-5s could be smaller.
A rectangle covering the three pins, with a 2 mm safety margin around each pin (the “pin envelope”), would measure 95.7 × 10.5 mm.
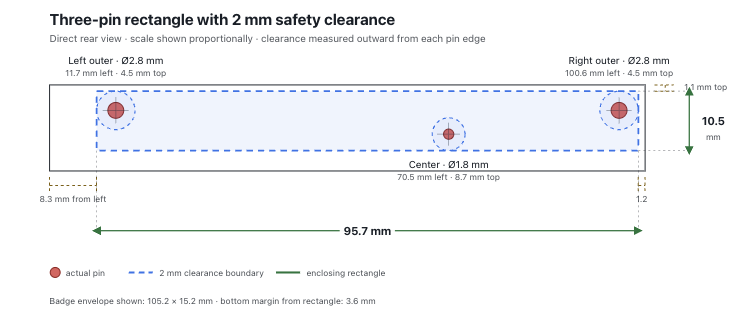
This would result in a relatively short working area. An alternative would be to reduce only the emblem’s width by 9.5 mm.
This would allow for working-area options such as:
- TINY: 86.5 × 6.3 mm (95.7 − 9.2 mm by 10.5 − 4.2 mm), using the minimum proposed emblem dimensions.
- NARROW: 86.5 × 11 mm (95.7 − 9.2 mm by 11 mm), retaining the emblem’s original height.
Depending on feedback, I will consider implementing these alternative models.